안드로이드 홈피에 나오는 노트패드 연습을 정리합니다.
Step 1
이클립스에서 Notepadv1를 연다.
이클립스의 패키지 익스플로러에서 마우스의 오른쪽 클릭을 하고 Import를 선택한다.
여기서 General/Existing Projects into Workspace를 선택한다.
Notepadv1의 폴더를 선택하고 finish 버튼을 누른다.
이클립스 우측하단에 에러표시가 나면, 프로젝트를 선택하고 마우스 오른쪽 키를 누르면 Android Tools->Fix Project Properties 가 있는데 이것을 선택하면 해결된다고 홈피에는 나와있다.
내가해본 결과로는 Fix 하더라도 문제가 여전히 남고 우측하단에 나온 에러를 더블클릭해서 문제점을 찾는 것이 더 빠른 길인 걸로 보인다.
Step 2
DBHelper 를 보라...음...
Step 3, Step 4
프로젝트를 선택하고 res/layout 에서 notepad_list.xml를 연다. 아래의 파란부분의 코드를 추가한다.
<?xml version="1.0" encoding="utf-8"?>
<LinearLayout xmlns:android="http://schemas.android.com/apk/res/android"
android:layout_width="wrap_content"
android:layout_height="wrap_content">
// 추가코드
<ListView id="@id/android:list"
android:layout_width="wrap_content"
android:layout_height="wrap_content"/>
<TextView id="@id/android:empty"
android:layout_width="wrap_content"
android:layout_height="wrap_content"
android:text="@string/no_notes"/>
//여기까지
</LinearLayout>
Step 5
프로젝트를 선택하고 res/layout 에서 notepad_row.xml를 생성한다. 아래의 코드를 추가한다.
<?xml version="1.0" encoding="utf-8"?>
<TextView id="@+id/text1"
xmlns:android="http://schemas.android.com/apk/res/android"
android:layout_width="wrap_content"
android:layout_height="wrap_content"/>
Step 6
Source 부분에서 Notepadv1 Class를 연다.
Step 7
Notepadv1 의 상속성을 Activity 에서 ListActivity 로 바꾼다.
public class Notepadv1 extends ListActivity
ListActivity로 변경하고 나면 에러가 발생하는데 ctrl-shift-O를 눌러서 import 시킨다.
Step 8
Notepadv1 클래스에는 이미 onCreate, onCreateOptionsMenu, onOptionsItemSelected 메소드가 존재하고 있다.
Step 9
아래와 같이 변경한다.
/** Called when the activity is first created. */
@Override
public void onCreate(Bundle icicle)
{
super.onCreate(icicle);
setContentView(R.layout.notepad_list);
dbHelper = new DBHelper(this);
fillData();
}
Step 10
onCreateOptionsMenu() 메소드는 아래와 같이 바꾼다.
@Override
public boolean onCreateOptionsMenu(Menu menu) {
// TODO Auto-generated method stub
//return super.onCreateOptionsMenu(menu);
boolean result = super.onCreateOptionsMenu(menu);
menu.add(0, INSERT_ID, R.string.menu_insert);
return result;
}
그리고 에러가 발생하게 되는데, 상수를 정의한다.
public static final int INSERT_ID = Menu.FIRST;
Step 11
onOptionsItemSelected()를 채운다.
@Override
public boolean onOptionsItemSelected(Item item) {
switch (item.getId()) {
case INSERT_ID:
createNote();
break;
}
return super.onOptionsItemSelected(item);
}
Step 12
createNote()를 추가한다.
private void createNote() {
String noteName = "Note " + noteNumber++;
dbHelper.createRow(noteName, "");
fillData();
}
Step 13
fillData()를 정의하지 않았으므로 여전히 에러를 표시하고 있을 것이다.
private void fillData() {
// We need a list of strings for the list items
List<String> items = new ArrayList<String>();
// Get all of the rows from the database and create the item list
List<Row> rows = dbHelper.fetchAllRows();
for (Row row : rows) {
items.add(row.title);
}
// Now create an array adapter and set it to display using our row
ArrayAdapter<String> notes =
new ArrayAdapter<String>(this, R.layout.notes_row, items);
setListAdapter(notes);
}
Step 14
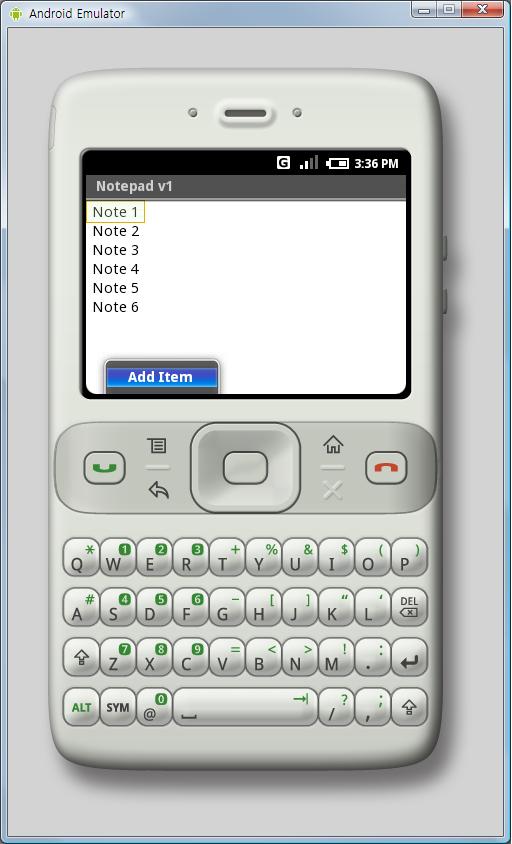
프로젝트를 선택하고 마우스 오른쪽 클릭한 뒤 Run As -> Android Application 하여 실행해보자
아래 처럼 메뉴를 볼 수 있을 것이다.